Be Up To Something Bigger Than Yourself - 60 minute Baptiste Inspired Power Vinyasa Audio Recording

11:54 AM 0 Comments A+ a-

The theme for this class was "Be Up To Something Bigger Than Yourself". Whether that shows up for you as donating time or money to your favorite charity or simply "paying it forward" - take this time to be introspective and look at the ways in which you are up to big things for others in your life. 60 minute Baptiste Inspired Power Vinyasa Yoga class - recorded at Jai Dee Yoga, Tampa FL 06/24/17
Libsyn:

Beginners And Beyond - 60 minute Baptiste Inspired Power Vinyasa Audio Recording

11:50 AM 0 Comments A+ a-

 
60 minute Baptiste Inspired Power Vinyasa Yoga class - recorded at Jai Dee Yoga, Tampa FL 06/19/17 This was a slower flow for a beginners class. Our focus was on proper alignment and sending energy out our fingertips!


Libsyn:

How To Record and Edit Your Yoga Teaching Video Files

12:50 PM 1 Comments A+ a-


The first thing you'll need to decide on is what type of device you'll use to record your video. In the past I have used cell phones or iPads clipped to tripods, but last year I found a great deal on an older model SJCAM (a GoPro knock off). The model I purchased is the M10, it records in 1080p, doesn't have wifi built in but does have a display screen on the back of the camera so you can see what will be in the frame. Having wifi built in would mean that I could export the video from the camera to my smart device (cell phone) but I don't need that feature. I needed a dead simple video camera to record me teaching yoga (submitting a video of me teaching is a requirement to obtain Baptiste Yoga Certification).

I found a good deal on the SJCAM M10 ($62 shipped). It shipped with a ton of different attachments and accessories (a waterproof enclosure) but it did not come with a lens cap. Luckily, I found a seller on eBay who 3D prints lens caps for the SJCAMs.

The primary accessories I use are the open top double threaded tripod mount, the 3D printed lens cap and a flexible tripod.

I prefer using the open top camera holder/tripod mount because it allows me to provide a local power source to the SJCAM as well as easily mount the camera from the top (clamping the tripod to a wall mounted light fixture) or the bottom (placing the tripod on a flat surface or window sill).

I've had the internal battery give out on me before the class was over and as a result, the video recording was a waste because the camera shut down half way through class. Providing local power to the SJCAM can be done by plugging it into wall power with a USB cable and any USB wall power converter. If you'll be recording where an electrical outlet is not present (or if you don't know if one will be available or not), you can use an external battery pack to provide power to the camera over the same USB cable you'd use with the wall outlet adapter. This gives you the flexibility of not needing an electrical outlet as well as not relying solely on the capacity of the SJCAM internal battery.

You will need a microSD card for the camera of your choice to record your video files. Most video camera manufacturers recommend using Class 10 memory cards (Class 10 cards have a much faster read/write speed than Class 1 cards do and are therefore are preferred for use in video cameras). Some cameras won't be able to read a memory card if its storage capacity is higher than 32GB, refer to the specifications for the camera you ultimately choose to be sure you're purchasing a compatible memory card. The microSD card will typically ship with a microSD adapter. You'll use this adapter to connect the memory card to your computer and copy off the video files you've recorded.

Another option is to purchase an SD/microSD to USB adapter (the gold colored adapter in the upper right hand corner of the picture above). This adapter will connect to any USB port on your computer and allow you to view data on SD or microSD memory cards.
Refer to the user manual for your camera for camera specific settings such as auto white balance, ISO, loop recording mode etc. I have set my SJCAM to record at the highest quality, use auto white balance and I've turned off recording audio. The video files the SJCAM will record are 4GB each due to the file size limits of SD cards. One hour of class will typically be in two 4GB 'chunks'. Since I don't record audio from the SJCAM, I sync the audio I record from my Sanyo with the video files in Camtasia (which is not free) but you can achieve the same functionality with an application called OpenShot Video Editor which is free.

As you can see in the screen captures above, the video editing interface for OpenShot is remarkably similar to that of the video editing Camtasia. I'll be using OpenShot as the video editor of choice in this blog post because it is free.
There are a few things you'll need to think about before you copy the video files off of the memory cards. You'll need enough hard drive space to hold the video files you're editing as well as the size of the video files you'll be producing from the original recordings. I recommend having at least 20GB or more free on your hard drive. If you're editing an hour's worth of video, that's 8GB +/- right there, plus at least 8GB for the video file you're creating from the original content. I have problems with Camtasia crashing if my hard drive doesn't have enough space to hold the video file I'm creating and I suspect it would be the same thing with OpenShot.
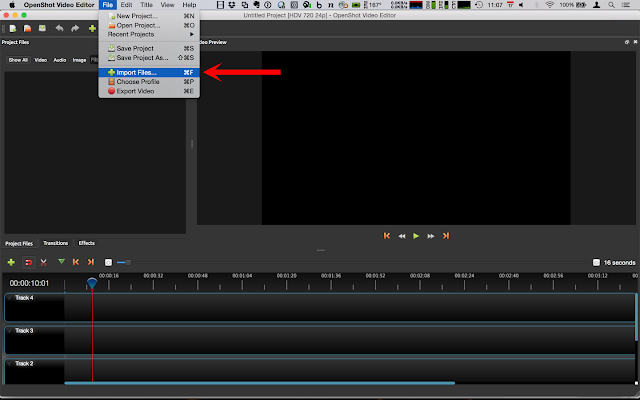
Use a microSD to SD card adapter or a microSD to USB adapter to copy the files your camera  created to a folder where you can find them. Launch the OpenShot Video Editor application and import your video and audio files. It is common for the video camera to create file names that increment with each clip created. As you can see, I have three files and #1 is has .001.MOV in the file name. Clip #2 has .002.MOV in the file name and so on.

The files you import will be displayed in the 'Project Files' window in the upper left hand corner of the screen.

By default OpenShot video editor puts five tracks at the bottom of the screen for you to add video or audio into (tracks 0-4). We'll only be working with one audio and one video track, so we can remove the unused tracks. Right click each track and select 'remove track' until you are left with Track 0 and Track 1.

Select the first video segment in the series from the 'Project Files' window, right click it and select 'add to timeline'. The video segment will be added into the timeline of Track 1. Click the orange 'jump to end' icon at the bottom of the 'Video Preview' window to move the playback 'cursor' to the end of the timeline for the first video segment you just added to the timeline. Doing this will make it easy for you to add the second video clip at the end of the first video clip.

When adding video clips to the timeline, accept the default settings shown by clicking OK. Select the second video clip and add it to the end of the first video clip. Continue this process of 'jump to end' followed by adding video clips until all video clips have been added to the timeline of Track 1.

Select the audio file to import and add it to Track 0. Doing this will allow the audio file to overlap the video segments which is what we want.

Find the beginning of the audio file by listening to the playback (if you have already edited your audio file using Audacity, you can skip this step since you've already trimmed the audio playback so that the beginning of your audio file is already the actual beginning of class). Once you've found the beginning, click the razor tool and make a cut in the audio file at that spot. Delete the beginning portion of unnecessary audio by hitting the delete key on your keyboard. Deselect the magnet tool (turning off 'snapping enabled') so that you can adjust the audio file freely from left to right to get it to be in sync with the video playback.


When you have the audio in sync with the video, use the razor tool to make a cut to the beginning and end of the video. Delete the unnecessary snippets. Select all of the video and audio sections (edit, select all) and drag them to the beginning of the playback timeline. Export your video.

When exporting your video, give the file a name and save it where you can find it. For video quality, choose YouTube-HD. Your video will export at 1080p HD video quality (most likely the same quality at which you recorded it, depending on your video recorder).

Wait for your video export to process. Preview your video to ensure it is of good quality and that it sounds and looks the way you expected. Now you can upload your video to YouTube, Vimeo or Facebook.

How To Edit Your Yoga Teaching Audio File

5:31 PM 1 Comments A+ a-


Continuing on with recording audio from your yoga teaching classes, this post deals with how to edit the audio files that you've recorded.
Now that you've got an audio recording, I recommend using Audacity to open/edit/enhance your audio files. It is a free application, there's a version for Mac and Windows too!
It is a good habit to start the audio recording well before you begin teaching so you won't forget to hit record! In this short video, I show you how to use the Audacity application to open a recording, trim off the beginning and end audio (before you actually started teaching), adjust the bass and export the file to mp3 (for distributing into podcasting services) as well as saving it to flac (if you want to share your recordings on mixcloud.com. I also cover how to embed appropriate MP3 tags and artwork into your mp3 files.


To open an audio recording in Audacity, click File, Open. Find the audio recording on your computer, select it and click Open.

Use the selection tool (looks like a capital I in the tool bar at the top of the Audacity application screen) to place your cursor into the wave form and find the beginning of the class recording by playing the file back. Once you've found the beginning, click Edit, Clip Boundaries, Split.

Double click the 'beginning' part of the file you want to remove and hit the delete key on your keyboard. Repeat the process of using the selection tool and playing back the audio recording to find the end of the class. You can choose to fade out the end portion by clicking Effect, Fade Out. Use the selection tool to mark the point between the end of the class and the part you want to trim off. Click Edit, Clip Boundaries, Split. Double click the end of the recording you want to remove and hit the delete key on your keyboard.

If the audio is too loud, adjust the volume down by clicking Effect, Amplify and entering a -1 or -3 value into the Amplification field. If the audio isn't loud enough, enter a value of 1 or 3 into the Amplification field. If you want to adjust the bass of the audio recording, click Effect, Bass and Treble and use the Preview function to make the recording sound good to your ears.
If you're going to put your recordings into a podcasting service, you'll want to make your stereo track mono by clicking Tracks, Stereo to Mono first before you export to MP3. Export your MP3 files as constant bit rate, 96kbps files by clicking 'options' next to the Format: MP3 field in Audacity.

Embedding artwork into your MP3s will be a thing you'll want to do if you want to submit your recordings to Apple's iTunes or Google Play as podcasts. You can use the application Tagr (on Mac) to embed album art.  Your artwork should be 1400 x 1400 pixels. Simply drag and drop the artwork into Tagr and then save to disk to finalize the artwork embedding. Tagr isn't a free app, it is $8.99 in the App Store, but I couldn't find a suitable free app to do what I needed.

My next post will cover recording video of your yoga class and using a free application called OpenShot video editor to sync your teaching audio recording with the video of the class.
SaveSave

How To Record Yourself Teaching Yoga

6:39 PM 0 Comments A+ a-


There are a great many reasons why you would want to record the yoga classes you teach. You could share them with your students, friends and family. You could publish them online as I blogged about here, or you could submit your content to YogaDownload.com, HitPlayYoga.com, AudibleYoga.com or any other number of online yoga sites. It is also a good habit to record your classes and take your own classes in order to see how your words land with you when you're the student instead of the teacher. As you listen to your own classes, you might discover things that help you to evolve and develop as a teacher.

For this post, I will stick to the basics of recording your own audio yoga classes. Some yoga studios have built in sound systems with wireless microphones for the instructors to wear (as in the image on the left up above). For this type of sound system, work with the owner/manager of the studio to record your teaching. If you don't work at a studio with a sound system and wireless mic setup, this post is for you. If you want to record your own audio with a small wearable microphone (see the image in the upper right hand corner above), this post is for you!

There are many different devices you could use to record your audio. You can use your phone (Apple or Android), a dedicated audio recording device (like the xacti I use) or any digital device that can record audio, preferably with an external microphone input. Using an external microphone is preferred so that you're recording less of the room audio and more of your voice giving the class verbal cues for the asana sequence.

Not all lavalier microphones are made the same. Some have a battery, others do not. Some may not work with the device you've chosen to use. For example, I have a lavalier microphone I'd previously purchased to use with my digital camera, but it did not work to record audio when I connected the microphone directly into my iPhone (4S or 6Plus) so I had to buy an adapter for the microphone to make the correct connection to my iPhone. I used this method of recording my audio until I was gifted a previously owned Sanyo xacti audio recorder.

There are sellers on Aliexpress who are selling lavalier microphones that are supposed to work with Apple devices and not need an adapter. I haven't purchased one of them, so I can't say for sure if they work as advertised. You'll want to purchase a lav mic with a short cord, so that you're not also wearing a big bunched up bundle of mic wires. I had another lav mic with a short cord (no idea where it came from), it works well with the xacti digital recorder.

If you are repurposing an older iTouch or other Android device, the first thing you'll need is a good belt clip or holster type clip for the device. You'll clip the device to the waistband of your shorts or leggings (most likely with the device clipped to the inside of your waistband for extra security). Finding a holster/clip for your device shouldn't be too difficult if it is a fairly current model.

If you are using a digital audio recorder (like the Sanyo xacti) you may find yourself with a problem finding a holster clip to hold the device (because it wasn't originally intended to be worn at the hip). For the Sanyo recorder, I made a holster out of a small piece of aluminum sheeting, cut with tin snips to fit based on a template I made out of lightweight cardboard. The little 'tab' of metal that covers the front of the Sanyo when it is inserted is designed to prevent accidental pushing of the buttons on the recorder. I used double sided tape to secure two strong magnets to the back side of the aluminum, then made a magnetic backing section by securing two small pieces of metal to a small piece of aluminum (as seen in the pictures). To protect the xacti from damage with insertion/removal from the holster, I lined the holster with a small piece of fabric glued in place with contact cement.

If you have an old phone headset you're not using any longer (but the microphone still works), you could use this as your wearable microphone. Cut the earbuds off of the headset, leaving just the microphone on the cord and use a small binder clip to secure the mic to your shirt. Run the cord on the inside of your top so you don't get tangled up in the wire.

Now that we have the holster problem sorted out, let's move on to how to record the audio. There are many apps to chose from for Android or Apple, for simplicity's sake, I'll keep this focus to one app for Android and one app for Apple.

Sony makes an app called Audio Recorder for Android devices. With it you can record stereo or mono MP3 files with your Android device and then upload those MP3s to a cloud storage service (in these examples I'll use Dropbox). Install the app, make a test recording and follow the instructions above to upload the audio MP3 to Dropbox. I'll cover editing the audio files in a separate blog post.

TapMedia LTD makes an app called Recorder for Apple devices. It performs the same functions as the Android Audio Recorder app. Download and install the app, make a test recording and follow the instructions above to upload the audio MP3 to Dropbox.

Now you are able to record your speaking voice when you're teaching yoga classes. Once you have recorded a teaching session, upload your audio to a "yoga teaching" folder on Dropbox. From there you can download the MP3 of your class to your laptop and edit the MP3 file (trim the beginning and end) for better sound quality before sharing or publishing online. My next blog post will cover the basic tweaks I do to my recorded classes before sharing/publishing them online.

Speak From The Heart - 60 minute Baptiste Inspired Power Vinyasa Audio Recording

12:16 PM 0 Comments A+ a-


This a 60 minute audio recording of a yoga class I taught at Jai Dee Yoga on 6/3/17. This was my first studio class after receiving excellent feedback from my mentor. I'm working to change up my default language as well as beginning to speak more from the heart and less from a book.


or

Libsyn

The Challenge To Reach Beyond Your Default Language

8:30 PM 0 Comments A+ a-

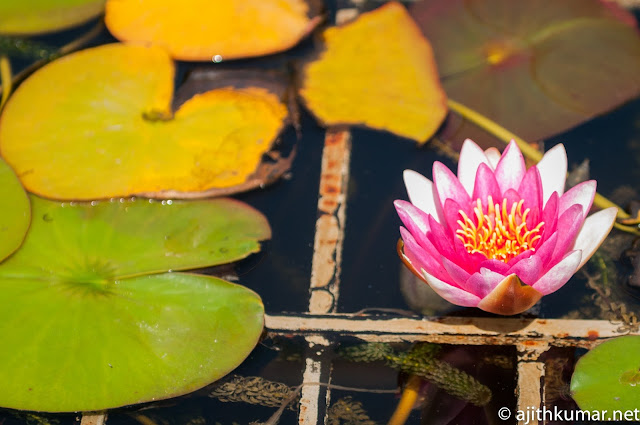
 Photo from Flickr @clicheshots

We've all heard the phrases "No mud, no lotus" and "Smooth seas don't make good sailors". This week I was gifted the opportunity to see my teaching from an objective point of view. My Baptiste Yoga mentor (Laura) gave me well thought out, constructive feedback on my teaching (as observed in Release Old Toxins & Indra's Net. She helped me see that I've developed a default language in my teaching which doesn't always serve the JIP flow and isn't necessarily what I'd intended to bring to every class. She also helped me see that the different sections of the JIP sequence call for different energy (air, Earth, fire, water) - it makes total sense, but I'd never really given it much thought.

I'd analyzed videos of other teachers to understand the pacing of a class and how to give useful verbal cues for the poses, but I'd never paid attention to the energy the teacher was bringing to each pose with simply the tone of their voice. The Journey Into Power flow takes a yogi on a roller coaster ride beginning with the grounded (Earth) energy in Integration through the fire energy in Igniting then back to Earth with Deep Rest. The feel of the yoga class is completely in the hands of the teacher. Is the teacher bringing a watery, groundedness to the flow with their voice, or are they encouraging the yogis present to aim higher, work their edge by bringing the element of fire to their voice when teaching?

The most recent recording I uploaded (Drop The Judgement) is one I recorded at home, teaching to my neighbors. They have been there for me as willing yogis to allow me to practice my teaching skills while they share their yoga practice with me. I confessed to them that I realize I have a tendency to read from existing works because that is safe. I avoid speaking from my heart when I'm teaching because the voice of judgement in my head says 'they'll think you're weird for saying that' or 'you don't even know what you're talking about, you're just rambling and not making sense'. For this class, I began without a script, without a book to read from and simply spoke my truth about the judgement voice. I called to them to notice if they have a similar voice and encouraged them to not listen to it if they do. I got caught up in my default of teach the poses and breath and forgot to bring them back to the theme that I'd started with.

With each class I teach, I will continue to make space in the words I use to allow the concepts raised in the beginning of class weave their way through the practice like ribbons woven through a little girl's braids. Each teaching opportunity is a learning experience and I'm thrilled to share my journey as a teacher with you reading this, every yogi at Jai Dee (where I teach) and everyone who attends the classes I teach from home.


Drop The Judgement - 60 minute Baptiste Inspired Power Vinyasa Audio Recording

3:51 PM 0 Comments A+ a-


This a 60 minute audio recording of a yoga class I taught from home on 6/1/17. I'm working to change up my default language as well as beginning to speak more from the heart and less from a book.